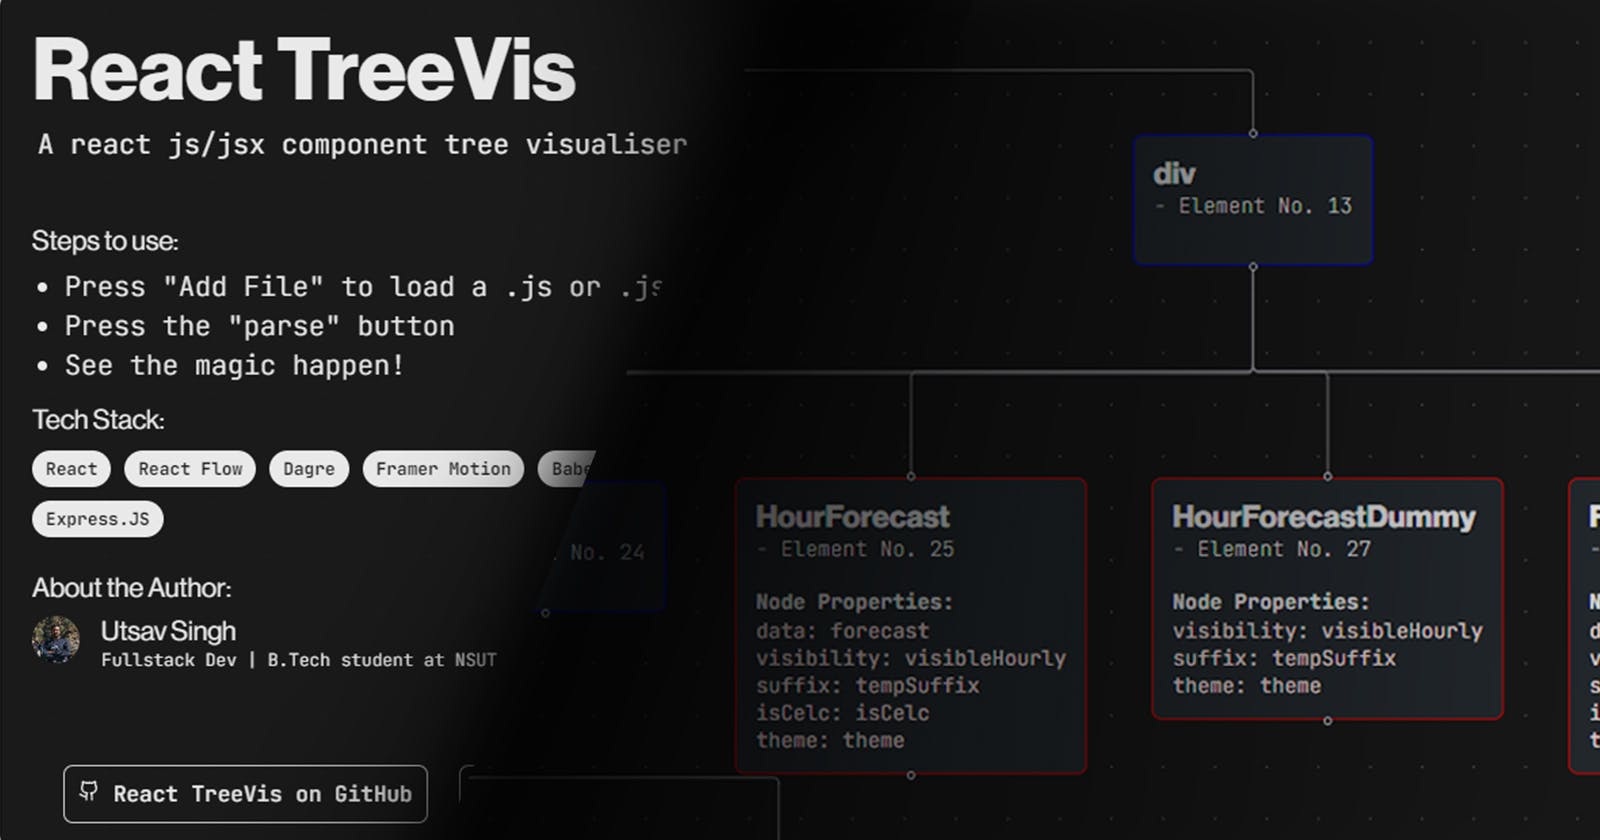
React Tree Visualizer: Creating a visualizer for .js/jsx component files.
A brief look into Abstract Syntax Trees , Babel and more...


TLDR - I built a tree visualizer to parse jsx content and ASTs in react files so that you don't have to figure out which component calls what. Check it out here!(currently beta :D)
Try using it with this Js file!
As someone who uses react for most of his projects, dealing with large amounts of nested components within a single file (oftentimes App.jsx) has become a daily occurrence. Revisiting component files that have not been used for some time can be a task in itself when trying to wrap your head around the somewhat cluttered and complex JSX code especially when a large number of props are involved.
And that’s when I thought:
why not build a tool that helps in visualizing the JSX contents of a react component file.
Before we start building, is a visualizer even needed?
I'm not entirely convinced of its usefulness in the production pipeline, but since the idea has surfaced, let's not dismiss it outright and build a prototype first.
The preliminary goal was to create a tool that allows users to load and parse their .js/jsx component file to visualize it in a tree-like structure that displays a hierarchy of detailed component nodes.
Okay let’s break it down
The most important part of this visualizer is going to be how we process the file content.
• Since we need to read and understand the file content it’s best to use a parser like Babel which can help us parse the file content in the form of an Abstract Syntax Tree or an AST (don’t know that is? don’t worry we will be discussing it soon) and then we can traverse this AST to get our visualization data.
• Okay so let’s assume we have extracted all the data we need from the file, now what we need is a way to represent it in a visually appealing manner react-flow plugins help a ton here!
These 2 major checkpoints we need to get the prototype up and running.
Parsers, ASTs and Babel.
A parser, often a component of a compiler, is a program responsible for breaking down code retrieved from the preprocessor into smaller components and analyzing it. Its primary role is to construct a data structure using these segments of input, enabling other software to comprehend the code more effectively.
Simply put it’s a program that reads your code and represents it in the form of a data structure.
Now what is an Abstract Syntax Tree (yes I didn’t make a mistake with the font weight here). As Wikipedia would describe it, an AST is a data structure often used to represent a program or code snippet. Remember how the parser represents the data in form of a data structure? Well, an AST is one of them. To be precise it’s a tree like data structure that is abstract in the sense that it is just a representation and not every detail of the code is present in it. It describes data like nested children opening elements, closing elements, attributes and a lot more.
I would suggest you check out AstExplorer to further understand how Js code can be represented in the form of an AST.
Here is an example on how a JSX element is represented.
Search is a react component.
The JSX element in question:

Its AST representation:
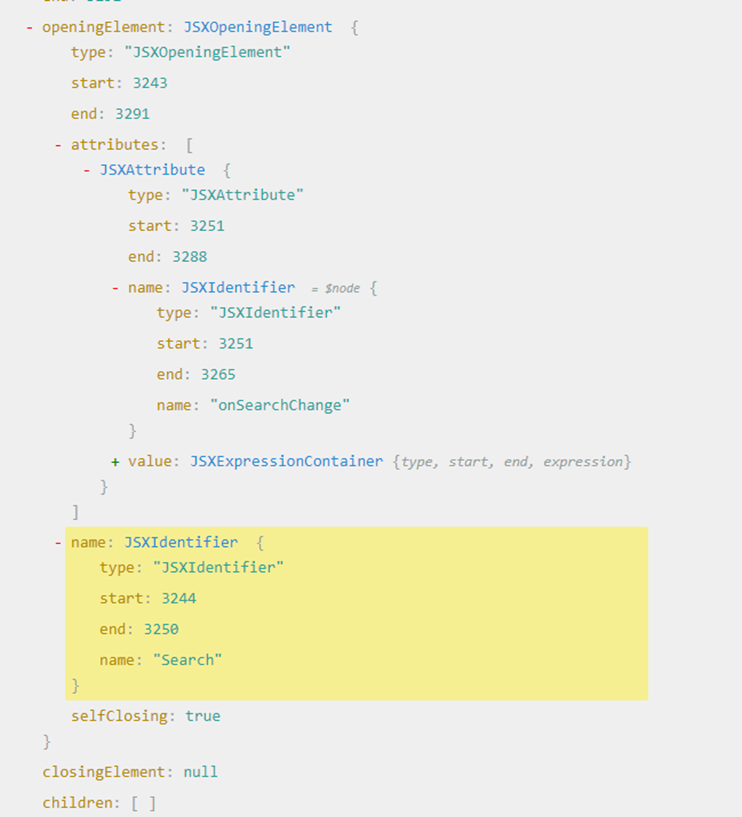
Notice how name of the Tag and prop information can be found easily in the AST representation.
And for now that’s all we are going to need.
Now where does Babel fit into the picture?
Babel offers inbuilt parser and traversal function that will allow us to convert our code into an AST and then traverse over the tree to extract the needed data.
Note: The Traversal function offered by babel indirectly calls upon node runtime variables like Buffer hence we will be using a Node server as the backend to parse our files and return extracted data to the client side.
Alright let’s get started
Using babel to parse your file content is as simple as this:
const { parse } = require('@babel/parser');
const traverse = require('@babel/traverse').default;
const ast = parse(jsxContent, {
        sourceType: 'module',
        plugins: ['jsx'],
});
Here jsxContent is nothing more than the selected text content of the selected file in the form of a string. The plugin allows us to parse any jsx content the file may have.
Similarly, the traverse function takes the AST as an input. We can also pass an object of functions that are executed whenever the corresponding element is encountered. As in the previous example during AST traversal whenever the Search component is found it would be found as a “JSXOpeningElement” and will trigger the corresponding function.
traverse(ast,{
        JSXOpeningElement(path){
            console.log('Encountered Opening Node: ' , path.node.name.name)
        },
        JSXClosingElement(path){
            console.log('Found Closing Tag of Node: ', path.node.name.name)
        }
    })
We can use this simple functionality to our advantage
As the node information object is passed as an attribute whenever a function is triggered. We can pass this information to a predefined function that can look at the type and value of the node encountered. Hence we can extract its properties and different attributes.
const rootProps = {};
    traverse(ast, {
        JSXOpeningElement(path) {
            if (path.parent.type === 'JSXElement' && path.parent.openingElement === path.node) {
                // Root component props
                path.node.attributes.forEach((attribute) => {
                    rootProps[attribute.name.name] = attribute?.value?.value;
                });
            }
        },
    });
Values like attribute.value.value might seem confusing at first but they will start making a lot more sense once you use a tool like AstExplorer to get an understanding of how an AST is structured.
Here, we have a function called extract components that is responsible for extracting all the node data that is going to be needed moving forward.
traverse(ast,{
    JsxOpeningElement (path) {
    // this is just an example representation of how to pass the node data
    // the original function deals with a lot more including things like parent stacks and ID counters
    const componentInfo = extractComponents(path.node) ;
    console. log(componentInfo) ;
    }
})
Here is a little code snippet from the function:
function extractComponents(node, parent = null, parentStack = [], zenParentStack=[], fileName, fileID, i) {
    if (node.type === 'JSXOpeningElement') {
        const componentName = `${node.name.name}- Element No. ${i}`;
        const props = {};
        node.attributes.forEach((attribute) => {
            if (attribute.type === 'JSXAttribute') {
                const attributeName = attribute.name.name;
                if (attribute.value && attribute.value.type === "Literal") {
                    props[attributeName] = attribute.value.value;
                }
                else if (attribute.name.name === 'className') {
                    props[attributeName] = attribute.value.value;
                }
            }
    }
// ... store all the info collected in an object then return it
}
As you can observe from this as well as the previous examples the challenge is mostly about going through the node object and finding the data you need which gets considerably easier once you understand the AST structure.
const componentInfo = {
            fileName: fileName,
            fileID: fileID,
            id: `${componentName}-${fileID}`,
            type: `treeNode`,
            data: { label: componentName, props, isSelected: false , isVisible:true, borderColor:'#808080'}, // Include props in the data
            position: { x: 0, y: 0 },
            parent,
};
For frontend visualization the library React Flow needs a list of Nodes and Edges. The Nodes must have a unique ID like in the above example, while the Edges must have source and target properties. The extractComponents function maintains a stack of Node IDs to maintain a proper tree like structure when the edges are created.
traverse(ast, {
    JSXOpeningElement(path) {
        if (path.node.selfClosing) {
            parentStack.pop();
        }
    },
    JSXClosingElement(path) {
        parentStack.pop();
    }
})
We simply pop out the latest ID from the stack whenever a closing Element is encountered or if the element is self-closing.
While we traverse the AST we maintain a list of nodes ( this list will be returned to the frontend for visualization purposes )
Similarly we maintain a list of edges:
edges.push({
    fileName: fileName,
    fileID: fileID,
    id: `${fileName}-${componentInfo.id}-${fileID}-${i++}`,
    source: updatedParentStack[componentLevel - 1],
    target: `${componentInfo.id}`,
    type: 'smoothstep', // Type of edge
    // there is detailed info about the different types of edges
    // in reactflow documentaiton
    animated: false,
});
Notice the source and target data that is being stored in the edge object.
componentInfo represents the current node and its data while the updatedParentStack is responsible for storing the id of the node that is directly above it in the tree hierarchy. In case it is among the outermost element then a dummy node consisting of the file name (that was loaded by the user) will be used as its parent.
Everything that has been discussed is handled inside a function that will be exposed to main server index.js file.
// parseJSXContent
    return { nodes, edges, zenNodes ,zenEdges };
}

module.exports = parseJSXContent;
zenNodes and zenEdges are just lists of nodes and edges that consist of only react component node data.
while the normal nodes and edges will also include normal HTML tags like div and span.
I am using a simple express based server where the file data is received using a POST request and the processed data is sent through the response object.
Backend:
app.post('/parse', bodyParser.text(), (req, res) => {
    try {
        const { nodes, edges , zenNodes , zenEdges } = parseJSXContent(req.body.fileContent, req.body.fileName, req.body.fileID);
        res.send({ nodes, edges , zenNodes , zenEdges });
    } catch (error) {
        res.status(500).send({ error: error.message });
    }
});
Frontend:
fetch(`${process.env.REACT_APP_BACKEND}parse/`, {
  method: 'POST',
  headers: {
    'Content-Type': 'application/json'
  },
  body: JSON.stringify({ fileContent: file.fileContent, fileName: file.name, fileID: file.ID })

})
  .then(res => {
    setIsLoading(false)
    if (!res.ok) {
      setIsErr(true)
      setIsLoading(false)
      throw new Error('Failed to parse file')
    }
    return res.json();
  })
  .then(response => {
    if (response.nodes.length > 0 && response.edges.length > 0) {
      setEdges((edges) => [...edges, ...response.edges]);
      setNodes((nodes) => [...nodes, ...response.nodes]);
    }
  })
Pretty simple right? We simply send the fileData as the body of the Post request. This data is used in the backend and the processed data returned within the response can be used in the frontend.
The setNodes and setEdges functions are made through the useState hook:
const [nodes, setNodes] = useState([]);
const [edges, setEdges] = useState([]);
This state is being maintained at the root level of the entire web app.
Once we have these states setup it’s just a simple matter of passing them to the right components!
<AnimatePresence>
<!--Animate Presence is a component from framer-motion -->
    <ReactFlowProvider>
        <ReactFlow
            nodes={nodes}
            edges={edges}
            onNodesChange={NodesChangeHandler}
            onEdgesChange={onEdgesChange}
            nodeTypes={nodeTypes}
            onNodeClick={onNodeClickHandler}
            fitView

        >
            <Panel position='top-left'>
                <span style={{ display: 'flex', gap: '1.5rem' }}>
                    <button onClick={infoExpandHandler} className='info-button' style={{ cursor: "pointer", border: 'none', background: 'none' }}>
                        <i className="icon"
                            style={{
                                backgroundImage: 'url("/images/info.png")',
                                filter: `invert(${isDark ? 1 : 0})`,
                                transition: 'scale 0.1s ease'
                            }}>
                        </i>
                    </button>
                </span>
            </Panel>
                 <!-- Feel free to add as many panel components as you need -->
            <Background color={isDark ? '#999' : '#333'} gap='40' variant={BackgroundVariant.Dots} />
            <Controls />
            <MiniMap pannable='true' maskColor={isDark ? "rgb(20, 20, 20, 0.6)" : "rgb(240, 240, 240, 0.6)"} />
        </ReactFlow>
    </ReactFlowProvider>
</AnimatePresence>
A quick run down of the props:
• Nodes: it’s the list of nodes to be rendered
• Edges: it’s the list of edges to be rendered
• onNodesChange and onEdgesChange have been assigned values like NodesChangeHandler which is an arrow functions that call hooks provided by the react flow library that allow us to Interact with the nodes and edges (moving them around etc. )
• nodeTypes: It is an object that allows us to define our own custom nodes. You must have noticed that the node objects have a “type” this attribute allows me to employ custom nodes for different types of nodes (for now I have differentiated between react components and normal HTML tags using different border colors for different node types)
 const nodeTypes = useMemo(() => {
        return { treeNode: TreeNode, reactTreeNode: ReactTreeNode }
  }, []); // define custom node types
// here TreeNode and ReactTreeNode are custom react components
// you can checkout how to make custom nodes for react flow in their docs
// the docs will be linked below in the resource section
• the Panel , Background , Controls and Minimap are components provided by react flow to add further interactivity and features to the viewport being rendered by the ReactFlowProvider.
Here is an image to show you how the different components show up:
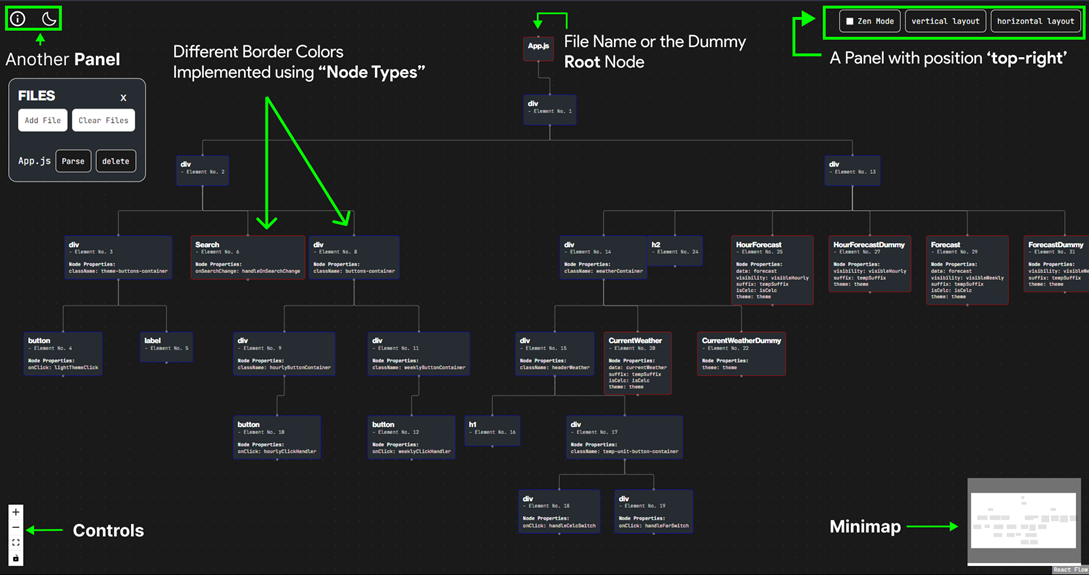
Personally, I have used framer motion on top of react flow to add simple snappy animations as well as a draggable file input component (the drag feature comes built in framer motion and is easy to customize and use). I would definitely suggest checking it out as well.
Conclusion
And you are done! Simplifying and condensing everything I have done within the project into a small easy to understand blog post is a task I hadn't typically considered I would find myself doing at 3 AM, but it did prove to be quite a fun experience!!
Check out the project deployment here!
React TreeVis on Github
Please let me know if you have any suggestions or comments! Feel free to reach out to me via my Twitter DMs or LinkedIn
Resources
Here is a list of resources to dive into once you are done reading this blog!
AstExplorer : https://astexplorer.net/
Babel docs: https://babeljs.io/docs/babel-parser
Reactflow: https://reactflow.dev/
Making Custom Nodes: https://reactflow.dev/learn/customization/custom-nodes
Framer Motion: https://www.framer.com/motion/
Express routing: https://expressjs.com/en/guide/routing.html
MDN Fetch Docs: https://developer.mozilla.org/en-US/docs/Web/API/fetch